Retargeting users on Facebook has become more difficult given the rise of cookie-less browsers. Facebook's pixel will only recognize a small percentage of your web traffic. However, if you know the email addresses of the people you want to target, you can still do so. That's where Opensend comes in - recognizing the user, and uploading their email addresses into your Facebook custom audience so you can retarget them with ads.
Opensend integrates directly with Facebook and takes care of hashing the email addresses as per Facebook's standards so that this process can be fully automated. As an added benefit, in cases where we identify more than one email per visitor, we'll deliver each to Facebook (whereas we deliver only the most active address to your email marketing platform). These additional addresses increase the odds of a match to the visitor's Facebook account email, and don't count towards your resolved identity quota.
Please see our best practices for retargeting with ads for recommendations on what custom audiences to create.
How do I integrate Opensend with Facebook/Meta to enable Programmatic Retargeting?
Prerequisites
You will need to confirm that you have the following items created and completed on Facebook before setting up integration with Opensend.
| REQUIREMENT | ORIGIN | DESCRIPTION |
|---|---|---|
| Facebook Business Manager | A centralized tool to manage your brand’s Facebook assets (for example, ad accounts, pages, apps). | |
| Facebook Ad Account | An active Facebook ad account tied to your brand’s business manager. Ensure that your Facebook business manager admin has granted you either “Manage Campaigns” or “Manage ad accounts” permissions to the Facebook ad accounts you plan to use with Opensend. Also ensure that you have accepted your ad account terms and conditions. |
|
| Facebook Custom Audiences Terms | Accept Facebook’s Custom Audiences Terms for your Facebook ad accounts you plan to use with Opensend. Your terms of service can be found at the following link: https://business.facebook.com/ads/manage/customaudiences/tos/?act=<your_ad_account_id> |
Method 1: Using Temporary - Facebook Login Token
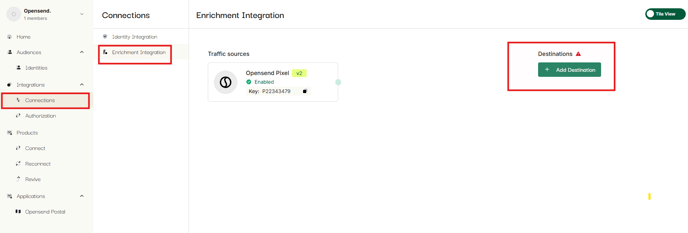
- Go to the integrations tab on the Opensend Dashboard
- Click on Connections
- Click on Enrichment Integration
- Click Add Destination
- Select Meta

- Add Name, Description, and Click Next

- You will be asked to Choose an integration method, select "Temporary - Facebook Login Token".

- Click on the "Connect to Facebook" button.
- It will then show you a popup to authenticate the login if you are already logged into your Facebook account. Click on "Continue as [Your Username]"
If you are not logged in already, it will prompt you to log in first.
- Make sure the toggle for "Manage ads for ad accounts that you have access to" is enabled and Click "Done"

- Click "Ok"

- Go back to the Opensend dashboard
- Select your ad account from the “Ad Account” drop-down menu
- Select a custom audience where you want to receive contacts OR create a new custom audience for Opensend contacts. You can name it “opensendcustomaudience”
- Click Next

- Select the Traffic sources from where you want to receive the data
- Click Create Connections

- Select the connections and Click Publish

Method 2: Permanent - Meta App Token
- Go to the integrations tab on the Opensend Dashboard
- Click on Connections
- Click on Enrichment Integration
- Click Add Destination
- Select Meta
- Add Name, Description, and Click Next
- You will be asked to Choose an integration method, select "Permanent - Meta App Token"
- You will be asked to enter the Access token from your Facebook account to enable the Opensend integration

- To obtain the Facebook access token, log in to your Meta Business Suite and follow the instructions below
- Go to Meta Business Suite and open “Settings”
- Go to Meta Business Suite and open “Settings”
-
- Click on “Apps” under “Accounts” on the left-hand panel
- Click on Add button in the upper right corner.

- Click on Create a new app ID

-
- Enter the name for your App. We suggest using "Opensend - Business name"
-
Click Next

- Select Other as app type and click Next.

-
Select "Business app" type

-
Click on "Create app" button

-
- From the dashboard of the app you just created click on Roles and then "Edit roles in Business manager"

- Now, click on system users under users and select your user.
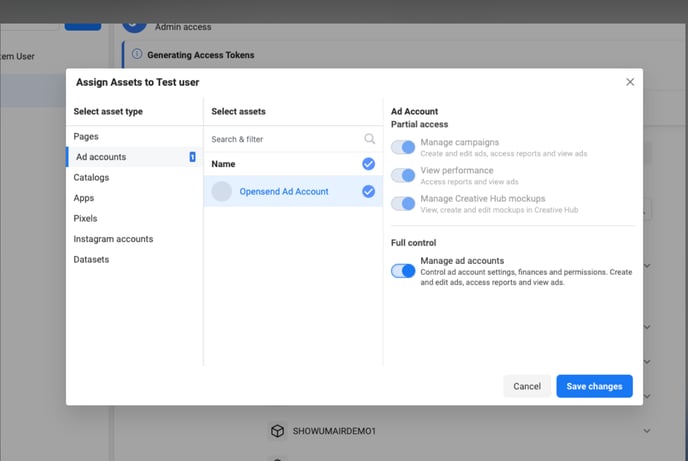
- Click on three dots and select the "Assign assets" option.

- Go to Ad account, provide "Manage app" full control permission, and click the "Assign assets" button.

-
- Go to apps and find the previously created app.
Provide "Manage app" full control permission and click on the "Assign assets" button.

- Click on the Generate token option.

- Select the previously created app and click Next.

- Choose "Never" for token expiration duration.

- Select ads_read and ads_management permissions.

-
Click on Generate token.

- Copy the newly generated “access token”.

- Go to apps and find the previously created app.
- After completing the steps detailed above, perform the following final actions. (Refer to the image below).
- Go back to the Opensend dashboard and paste the access token under “Access Token” and Validate
- Select your ad account from the “Ad Account” drop-down menu.
- Select a custom audience where you want to receive contacts OR create a new custom audience for Opensend contacts. You can name it “opensendcustomaudience”.
- Click “Next”.

- Select the Traffic sources from where you want to receive the data
- Click Create Connections
- Select the connections and Click Publish
Notes:
a) Before enabling Facebook integration, kindly ensure that one of the Main connections under integrations is already activated, as Facebook integration requires at least one Main connection to be enabled.
b) If you cannot see your Ad Account in the Opensend Ad drop-down menu, please follow the steps mentioned below:
- Add permission to the Ad Account by clicking the "Add Assets" button and enabling "Full control" for "Manage ad accounts".
- Sometimes, you must generate a new token after updating the permission before the Ad account appears in the drop-down menu.