How do I track e-commerce events and user activity on Sendlane for Opensend contacts?
This guide helps you set up a custom integration in Sendlane's dashboard, allowing you to implement cookie sync between Opensend and Sendlane to track e-commerce events and user activity.
Log in to Sendlane
-
Go to the Sendlane login page.
-
Enter your credentials (email and password) and click Login.
Accessing the API Settings
-
Click on the Account Gear icon
-
Click on Integrations

-
On the Integrations page, locate and select the Custom Integrations section.

Embed Active on Site Script to your website
If you are already using Custom integration with an existing token follow the steps below to sync the events tracking for Opensend contacts
-
Go to Integrations
-
Select Custom Integration
-
Create a new custom integration and name Store as Opensend (not any other name)
-
Select your default Opensend list where contacts will be synced and click on the Save button
In this case, there is no need to add Javascript code to the website since it would overwrite your original setup for custom integration. You only need to create a new integration called Opensend.
If you are already using Beacon tracking follow the steps below to sync the events tracking for Opensend contacts
-
Go to Integrations
-
Select Custom Integration from the available options.
- Create a new custom integration and name Store as Opensend (not any other name)
-
Select your default Opensend List where contacts will be synced to
-
Copy the tracking code from the Opensend Custom Integration
<script src="https://sendlane.com/scripts/pusher.js"
async data-token="tokenthatyouhaveincustomintegration"></script> -
Click on the Save button
Note:
Original Beacon Script:
Before making any changes, your existing Beacon script looks like this:
<script>
window._Sendlane = window._Sendlane || [];
</script>
<script src="https://sendlane.com/scripts/pusher.js" async></script>
<script>
_Sendlane.push({
    event_id: 'XXXXXXXXXXXXXX'
});
</script>
Instructions to Modify:
-
Locate the second
<script>tag in your original Beacon script:<script src="https://sendlane.com/scripts/pusher.js" async></script>
-
Replace it with the following code, that you previously copied in the last step from your Opensend Custom Integration:
<script src="https://sendlane.com/scripts/pusher.js"
async data-token="tokenthatyouhaveincustomintegration"></script>
This update ensures that your Beacon tracking script now includes the necessary token for the Opensend integration.
Modified Beacon Script:
Your Beacon code should look like this after updates are made, copy the adjusted code to replace in the header of your website
<script>
<script>
window._Sendlane = window._Sendlane || [];
</script>
<script src="https://sendlane.com/scripts/pusher.js"
async data-token="tokenthatyouhaveincustomintegration"></script>
<script>
_Sendlane.push({
    event_id: 'XXXXXXXXXX'
});
</script>
If you are not using Custom integration or Beacon tracking
-
Go to Integrations
-
Select Custom Integration from the available options.
- Create a new custom integration and name Store as Opensend (not any other name)
-
In the Store Settings, select Opensend list to sync new contacts
- Click Continue

-
Copy the Code Script to add to your Store website to activate cookie sync between Opensend and Sendlane. This script contains the Integration Token which will allow Opensend to retrieve historical activities of all contacts in the custom List selected above.

Use Beacon event tracking
-
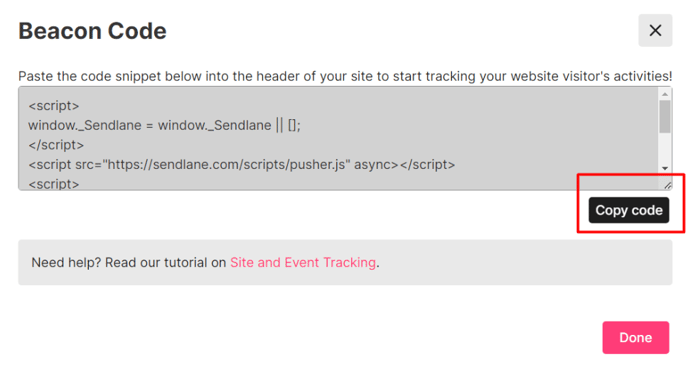
Go to Beacon and click on Get Beacon Code

2. Copy Beacon code

Original Beacon Script:
Before making any changes, your existing Beacon script looks like this:
<script>
window._Sendlane = window._Sendlane || [];
</script>
<script src="https://sendlane.com/scripts/pusher.js" async></script>
<script>
_Sendlane.push({
    event_id: 'XXXXXXXXXXXXXX'
});
</script>
Instructions to Modify:
-
Locate the second
<script>tag in your original Beacon script:<script src="https://sendlane.com/scripts/pusher.js" async></script>
-
Replace it with the following code, that you previously copied in the last step from your Opensend Custom Integration:
<script src="https://sendlane.com/scripts/pusher.js"
async data-token="tokenthatyouhaveincustomintegration"></script>
This update ensures that your Beacon tracking script now includes the necessary token for the Opensend integration.
Modified Beacon Script:
Your Beacon code should look like this after updates are made, copy the adjusted code to replace in the header of your website
<script>
<script>
window._Sendlane = window._Sendlane || [];
</script>
<script src="https://sendlane.com/scripts/pusher.js"
async data-token="tokenthatyouhaveincustomintegration"></script>
<script>
_Sendlane.push({
    event_id: 'XXXXXXXXXX'
});
</script>
Creating and tracking custom events using Beacon
-
Go to Beacon and click on the Create Event button

-
Enter a Name and Description for your Event (In our example it is a viewed product page) and click on Save

-
Click on Get code button

-
Copy and add Event code to the website code where you want to track this event

-
After doing this, you will be able to track Beacon custom events that you created for your contacts with the help of Opensend cookie-sync.
Results in the engagement screen when a user visits a page containing a product for the event we created above:
Start using custom events to trigger email flows for Opensend contacts
Once the embedded the relevant Active on Site Script to your website for cookie-sync, you can use all the custom events as a result of our cookie-sync to trigger any flows in Sendlane for Opensend contacts
Example:
