To help brands fully capitalize on Opensend Reconnect, we recommend implementing four strategic Salesforce Marketing Cloud (SFMC) Journeys designed to re-engage high-intent, anonymous shoppers through precise, event-triggered messaging. These include:
- Session Abandonment, which targets users who viewed products but took no action
- Product Abandonment, engaging those who showed product-level interest without adding to the cart
- Cart Abandonment Reminder, nudging cart abandoners who didn’t initiate checkout
- Checkout Abandonment, focused on recovering users who started—but didn’t complete—the checkout process.
General Notes
SFMC Journeys: For triggers use Opensend-specific event_type
Filtering: Strict exclusion of events from the default journeys and other similar tools tracking events/metrics
Configuring Entry Rules (Global Suppressions):
- Entry Rules determine who is allowed to enter a Journey.
- Use cases include:
- Preventing users who already completed a purchase from re-entering
- Avoiding conflict with similar event-based journeys from other tools
- Enforcing cool-down periods
Implement a waterfall across all abandonment journeys, placing Opensend Reconnect where appropriate. Time delays, filters, and entry rules should be configured accordingly.
Personalize Journey Templates by using Reconnect Event Payload
Personalize journey templates using dynamic content from the Opensend Reconnect event payload. For a detailed breakdown of each Reconnect metric, refer to the documentation here.

Prerequisites: Link Data Extension to Contacts Data
When using a Decision Split in Journey Builder, it's important to know what data sources it can access:
- Journey Data: This includes the entry event payload or the journey context.
- Contact Data: These are attributes defined within the Contact Model.
- Related Data Extensions: Only Data Extensions that are linked to the Contact Model within Contact Builder's Data Designer are accessible.
Therefore, to utilize Opensend Reconnect Event data within a Decision Split, the corresponding Data Extension must be linked to the Contact Model.
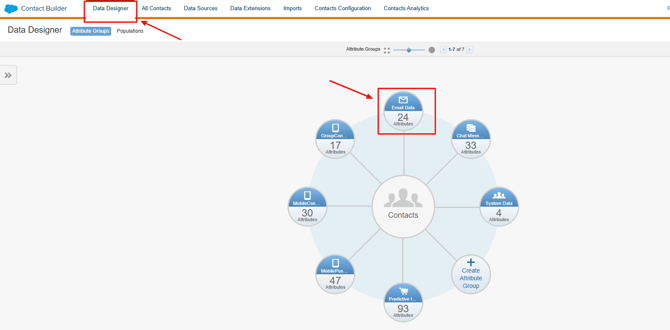
Select Attribute group
Within Audience Builder > Contact Builder > Data Designer, locate and select the Email Data attribute group. Please create it if it does not already exist.
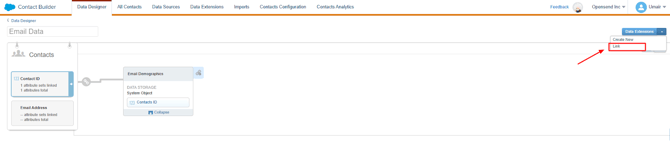
Link data extension
Next to the Data Extension button, click the small arrow, and then select Link.
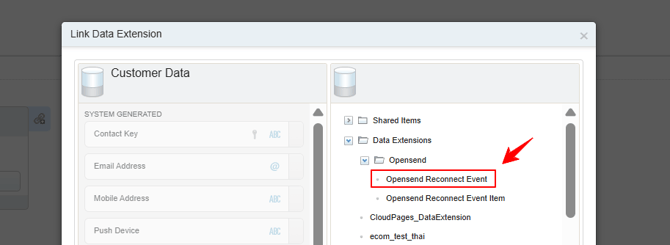
In the modal that appears, choose the Opensend Reconnect Event data extension.
Establish a “Many” relationship by linking the Email Address of Customer Data to the email field in the data extension.
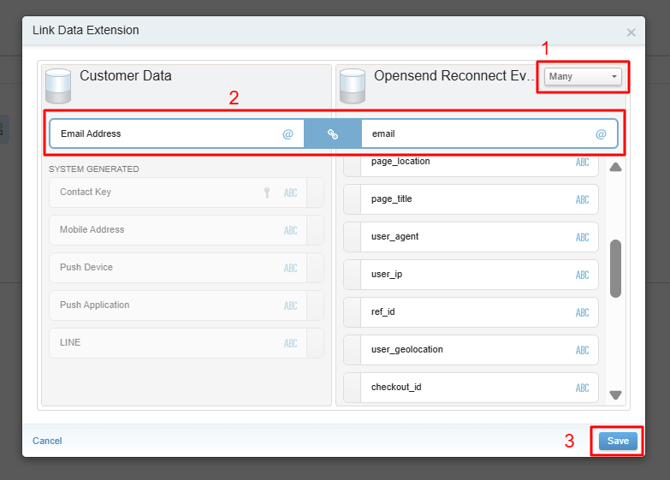
Save the relationship by pressing "Save."
Salesforce Marketing Cloud (SFMC) Opensend Reconnect Journey Best Practices
🔄 1. Session Abandonment Journey (Opensend Reconnect)
To implement this journey, we recommend either cloning your existing Multi-step Journey for the same event and adjusting the configuration as outlined below, or creating a new journey from scratch.
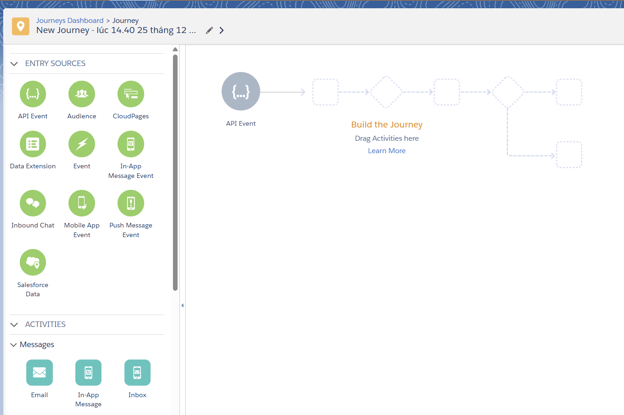
1.1 Setting up an Entry Source
-
Select API Event Entry Source
- Drop the API Event Entry Source element onto your journey canvas.

-
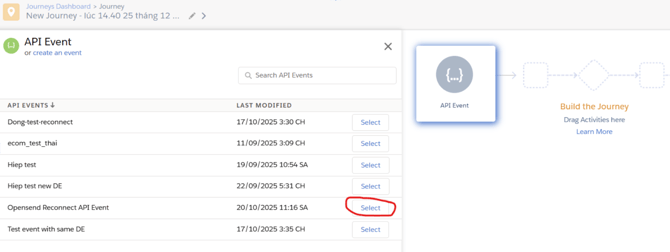
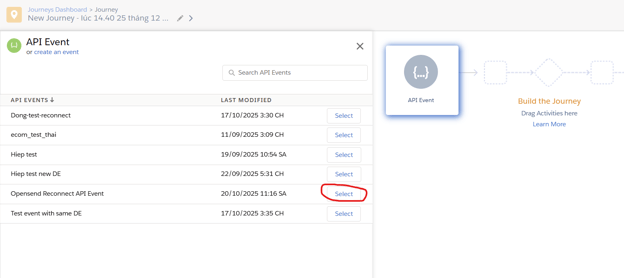
Select API Event
- Click on the API Event Entry Source and select the Opensend Reconnect API Event API event:

-
Now, you will set up event filter (which determines which events will trigger the Journey)
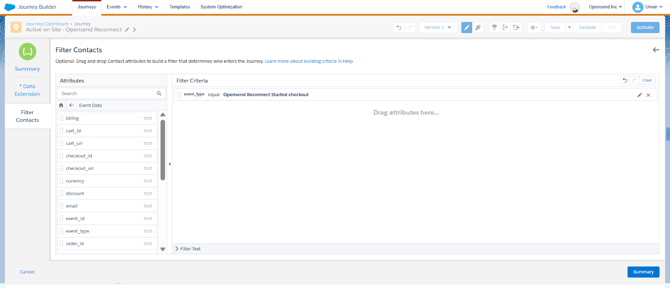
- Click the Edit button to modify the Filter Contacts settings
- In the Filter Contacts window, navigate to Journey Data -> Event Data
- Drag the event_type attribute into the Filter Criteria
- Set the condition to trigger the journey. For example, you could set the condition so the journey is only triggered if the event is Opensend Reconnect Device Profile Detected
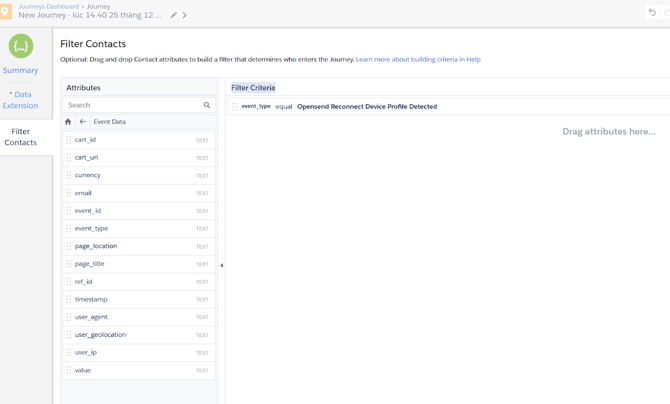
- Click Done to save the API Event setup after configuring the Filter Contacts.
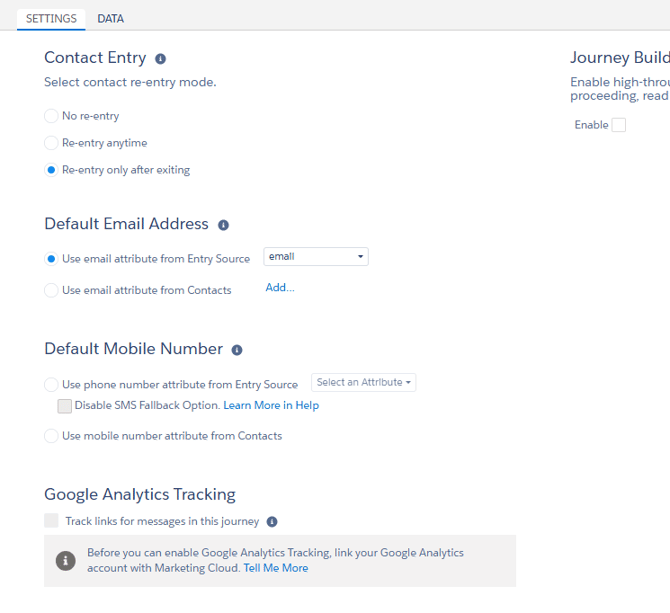
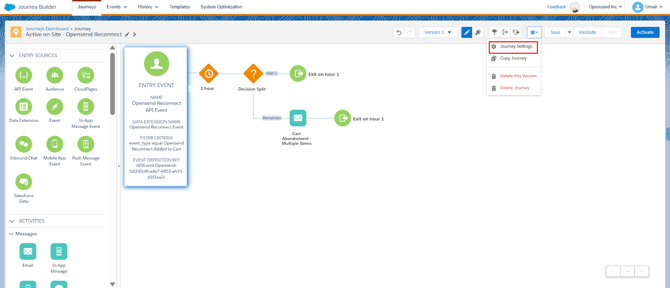
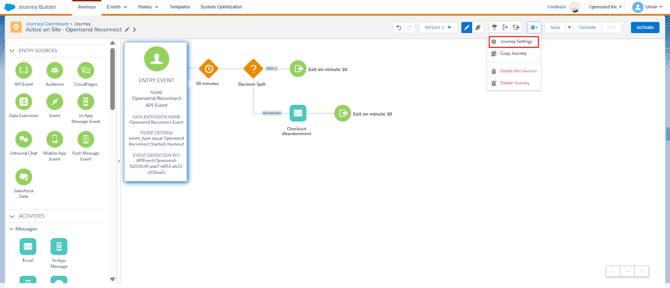
- Click on Journey Settings:
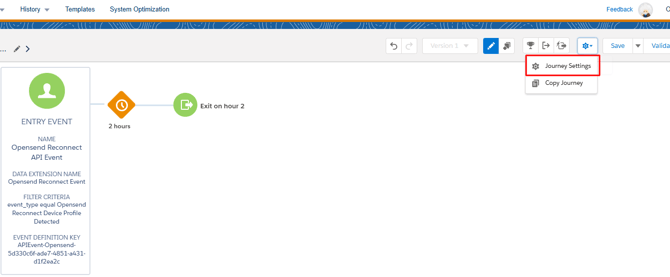
- Select the following options and click “Done”:
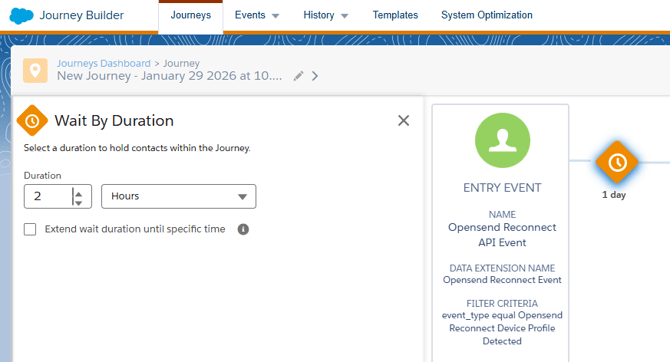
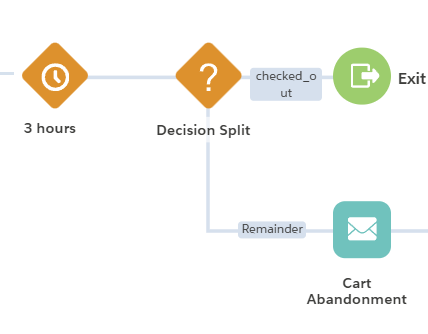
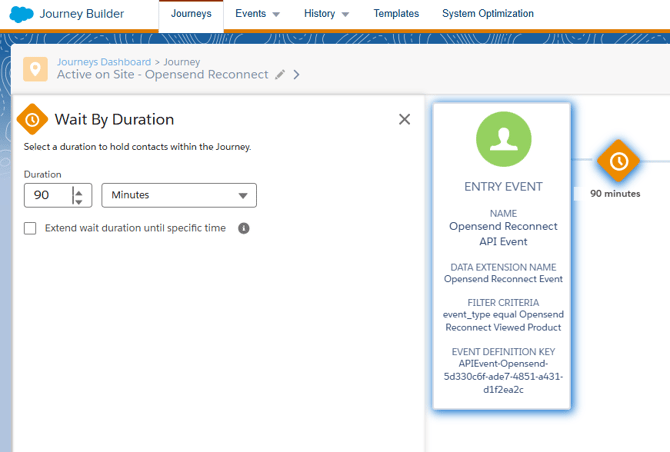
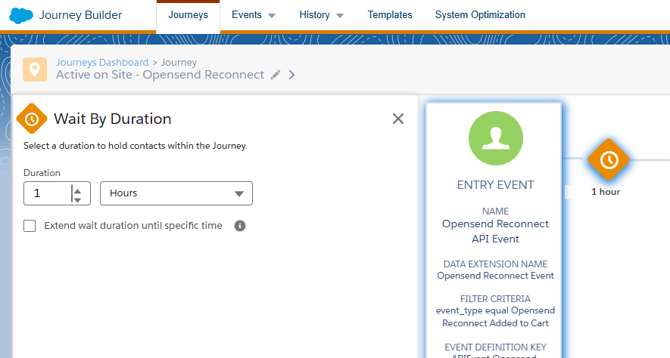
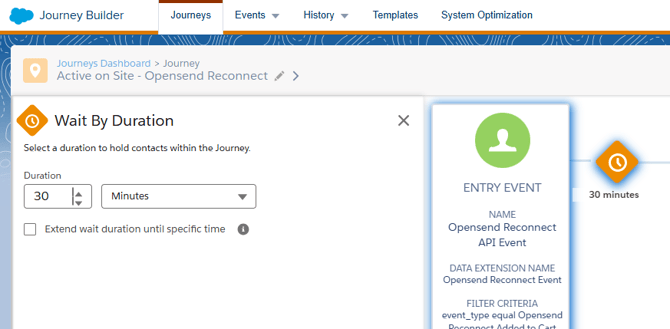
1.2 Wait By Duration
Wait for: 2 Hours
1.3 Using In-Journey Flow Control
Flow Control allows you to:
- Separate Buyer vs Non-Buyer
- Add event-based checks mid-Journey
- Create delays or fallback logic
Exclude users who triggered:
Default Events:
- Placed Order, Added to Cart, Viewed Product, Started Checkout, Active On Site
Other tools metrics:
- Tool 1: Viewed Product, Added to Cart, Checkout Started
- Tool 2: Viewed Product, Added to Cart, Checkout Started
- Similarly, excluding metrics from any other identity providers you are using
Other Opensend Reconnect metrics:
- Opensend Reconnect Viewed Product, Opensend Reconnect Added to Cart, and Opensend Reconnect Started Checkout
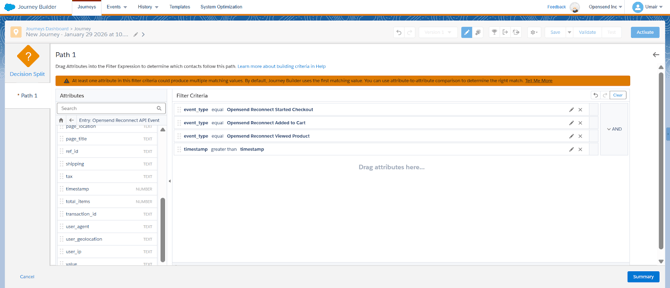
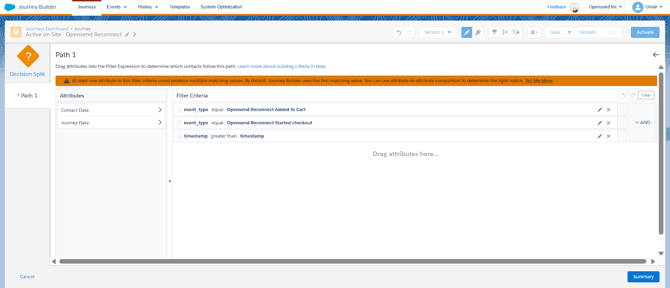
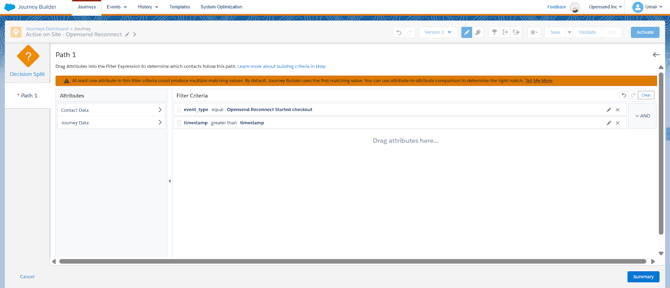
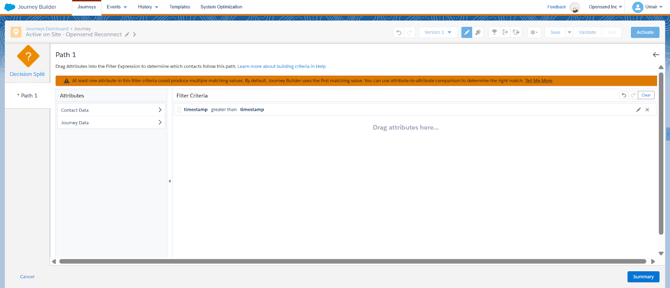
Decision Split Logic:
- Contact Data -> Email Data -> Opensend Reconnect Event -> event_type equals one of the defined events.
- Contact Data -> Email Data -> Opensend Reconnect Event -> timestamp greater than Journey Data -> Entry: Opensend Reconnect API Event -> timestamp.
The following screenshot shows a few examples:
1.4 Flow Dynamic Content Update:
For the Session Abandonment Email, no e-commerce event data will be used or accessible. Default email templates should be used as currently configured.
However, the following dynamic variables can be used within the email content:
- Page Title -
- Page Location -
- User Geolocation -
- User Agent -
Example HTML email: Welcome back
We can access subscriber information by using Salesforce Personalization:
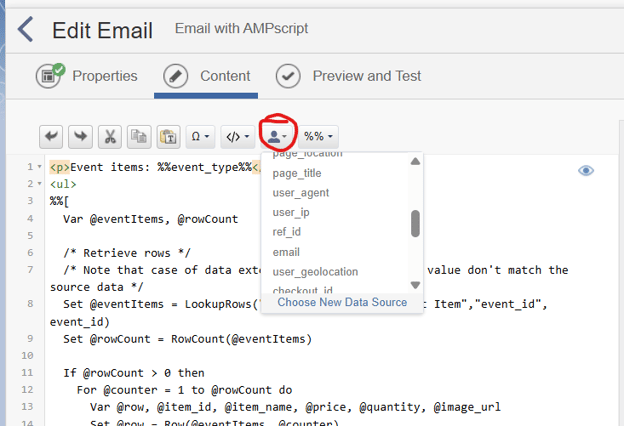
To access event items, we can use AMPScript to query the Opensend Reconnect Event Item DE:
<p>Event items:</p>

<ul>

%%[

  Var @eventItems, @rowCount

  /* Retrieve rows */

  /* Note that case of data extension, column name, and value don't match the source data */

  Set @eventItems = LookupRows("Opensend Reconnect Event Item","event_id", event_id)

  Set @rowCount = RowCount(@eventItems)

  If @rowCount > 0 then

    For @counter = 1 to @rowCount do

      Var @row, @item_id, @item_name, @price, @quantity, @image_url

      Set @row = Row(@eventItems, @counter)

      Set @item_id = Field(@row, "item_id")

      Set @item_name = Field(@row, "item_name")

      Set @price = Field(@row, "price")

      Set @quantity = Field(@row, "quantity")

      Set @image_url = Field(@row, "image_url")

]%%

  <li>%%=v(@item_id)=%% %%=v(@item_name)=%% %%=v(@price)=%%)  %%=v(@quantity)=%% %%=v(@image_url)=%%</li>

%%[

      Next @counter

  EndIf

]%%

</ul>
🛍️ 2. Browse/Product Abandonment Journey (Opensend Reconnect)
To implement this journey, we recommend either cloning your existing journey for the same event and adjusting the configuration as outlined below, or creating a new journey from scratch if one doesn't already exist.
2.1 Setting up an Entry Source
-
Select API Event Entry Source
- Drop the API Event Entry Source element onto your journey canvas.
-
Select API Event
- Select the Opensend Reconnect API Event
-
Set up the event filter- which determines which events will trigger the Journey
- Click the Edit button to modify the Filter Contacts settings
- In the Filter Contacts window, navigate to Journey Data -> Event Data
- Drag the event_type attribute into the Filter Criteria
- Set the condition to trigger the journey. For instance, you could set the condition so the journey is only triggered if the event is Opensend Reconnect Viewed Product

- Click Done to save the API Event setup after configuring the Filter Contacts.
- Click on Journey Settings (see below):
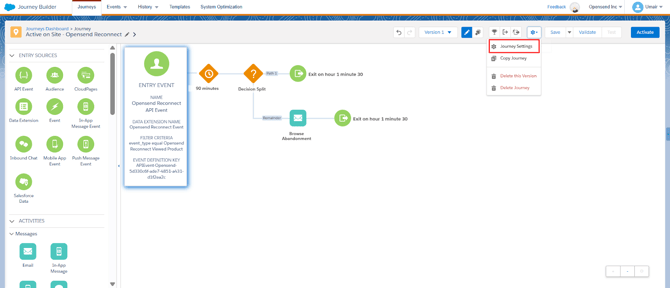
- Select the following options and click “Done”:

2.2 Wait By Duration
Wait for: 90 Minutes
2.3 Using In-Journey Flow Control
Flow Control allows you to:
- Separate Buyer vs Non-Buyer
- Add event-based checks mid-Journey
- Create delays or fallback logic
Exclude users who triggered:
Default Events:
- Placed Order, Added to Cart, Viewed Product, Started Checkout
Other tools metrics:
- Tool 1: Added to Cart, Checkout Started
- Tool 2: Added to Cart, Checkout Started
- Similarly, excluding metrics from any other identity providers you are using
Other Opensend Reconnect metrics:
- Opensend Reconnect Added to Cart, and Opensend Reconnect Started Checkout
Decision Split Logic:
- Contact Data -> Email Data -> Opensend Reconnect Event -> event_type equals one of the defined events.
- Contact Data -> Email Data -> Opensend Reconnect Event -> timestamp greater than Journey Data -> Entry: Opensend Reconnect API Event -> timestamp.
The following screenshot shows a few examples:
2.4 Flow Dynamic Content Update:
You can use the following dynamic variables in your email content:
- Product Image URL - image_url
- Product Title - item_name
- Product Page URL - url
- Product Price - price
- Product Price - quantity
Example HTML email: Browse Abandonment
We can access subscriber information by using Salesforce Personalization:
To access event items, we can use AMPScript to query the Opensend Reconnect Event Item DE:
<p>Event items:</p>

<ul>

%%[

  Var @eventItems, @rowCount

  /* Retrieve rows */

  /* Note that case of data extension, column name, and value don't match the source data */

  Set @eventItems = LookupRows("Opensend Reconnect Event Item","event_id", event_id)

  Set @rowCount = RowCount(@eventItems)

  If @rowCount > 0 then

    For @counter = 1 to @rowCount do

      Var @row, @item_id, @item_name, @price, @quantity, @image_url

      Set @row = Row(@eventItems, @counter)

      Set @item_id = Field(@row, "item_id")

      Set @item_name = Field(@row, "item_name")

      Set @price = Field(@row, "price")

      Set @quantity = Field(@row, "quantity")

      Set @image_url = Field(@row, "image_url")

]%%

  <li>%%=v(@item_id)=%% %%=v(@item_name)=%% %%=v(@price)=%%)  %%=v(@quantity)=%% %%=v(@image_url)=%%</li>

%%[

      Next @counter

  EndIf

]%%

</ul>
🛒 3. Cart Abandonment Journey (Opensend Reconnect)
To implement this journey, we recommend either cloning your existing Journey for the same event and adjusting the configuration as outlined below, or creating a new journey from scratch.
3.1 Setting up an Entry Source
-
Select API Event Entry Source
- Drop the API Event Entry Source element onto your journey canvas.
-
Select API Event
- Click on the API Event Entry Source and select the Opensend Reconnect API Event API event:
-
Now, set up the event filter, which determines which events will trigger the Journey
- Click the Edit button to modify the Filter Contacts settings
- In the Filter Contacts window, navigate to Journey Data -> Event Data
- Drag the event_type attribute into the Filter Criteria
- Set the condition to trigger the journey. For instance, you could set the condition so the journey is only triggered if the event is Opensend Reconnect Added to Cart

- Click Done to save the API Event setup after configuring the Filter Contacts.
- Click on Journey Settings:
- Select the following options and click “Done”:
3.2 Wait By Duration
Wait for: 1 Hour
3.3 Using In-Journey Flow Control
Flow Control allows you to:
- Separate Buyer vs Non-Buyer
- Add event-based checks mid-Journey
- Create delays or fallback logic
Exclude users who triggered:
Default Events:
- Placed Order, Added to Cart, Started Checkout
Other tools metrics:
- Tool 1: Checkout Started
- Tool 2: Checkout Started
- Similarly, excluding metrics from any other identity providers you are using
Other Opensend Reconnect metrics:
- Opensend Reconnect Started Checkout
Decision Split Logic:
- Contact Data -> Email Data -> Opensend Reconnect Event -> event_type equals one of the defined events.
- Contact Data -> Email Data -> Opensend Reconnect Event -> timestamp greater than Journey Data -> Entry: Opensend Reconnect API Event -> timestamp.
The following screenshot shows a few examples:
3.4 Flow Dynamic Content Update:
You can use the following dynamic variables in your email content::
- Product Image URL - image_url
- Product Title - item_name
- Product Page URL - url
- Product Price - price
- Product Price - quantity
Example HTML email: Cart Abandonment
We can access subscriber information by using Salesforce Personalization:
To access event items, we can use AMPScript to query the Opensend Reconnect Event Item DE:
<p>Event items:</p>

<ul>

%%[

  Var @eventItems, @rowCount

  /* Retrieve rows */

  /* Note that case of data extension, column name, and value don't match the source data */

  Set @eventItems = LookupRows("Opensend Reconnect Event Item","event_id", event_id)

  Set @rowCount = RowCount(@eventItems)

  If @rowCount > 0 then

    For @counter = 1 to @rowCount do

      Var @row, @item_id, @item_name, @price, @quantity, @image_url

      Set @row = Row(@eventItems, @counter)

      Set @item_id = Field(@row, "item_id")

      Set @item_name = Field(@row, "item_name")

      Set @price = Field(@row, "price")

      Set @quantity = Field(@row, "quantity")

      Set @image_url = Field(@row, "image_url")

]%%

  <li>%%=v(@item_id)=%% %%=v(@item_name)=%% %%=v(@price)=%%)  %%=v(@quantity)=%% %%=v(@image_url)=%%</li>

%%[

      Next @counter

  EndIf

]%%

</ul>
🧾 4. Checkout Abandonment Journey (Opensend Reconnect)
To implement this journey, we recommend either cloning your existing journey for the same event and adjusting the configuration as outlined below, or creating a new journey from scratch.
4.1 Setting up an Entry Source
-
Select API Event Entry Source
- Drop the API Event Entry Source element onto your journey canvas.
-
Select API Event
- Click on the API Event Entry Source and select the Opensend Reconnect API Event API event:
-
Now, set up the event filter, which determines which events will trigger the Journey.
- Click the Edit button to modify the Filter Contacts settings.
- In the Filter Contacts window, navigate to Journey Data -> Event Data.
- Drag the event_type attribute into the Filter Criteria.
- Set the condition to trigger the journey. For instance, you could set the condition so the journey is only triggered if the event is Opensend Reconnect Started Checkout
- Click Done to save the API Event setup after configuring the Filter Contacts.
- Click on Journey Settings:
- Select the following options and click “Done”:
4.2 Wait By Duration
Wait for: 30 Minutes
4.3 Using In-Journey Flow Control
Flow Control allows you to:
- Separate Buyer vs Non-Buyer
- Add event-based checks mid-Journey
- Create delays or fallback logic
Exclude users who triggered:
Default Events:
- Placed Order, Started Checkout
Decision Split Logic:
- Contact Data -> Email Data -> Opensend Reconnect Event -> event_type equals one of the defined events.
- Contact Data -> Email Data -> Opensend Reconnect Event -> timestamp greater than Journey Data -> Entry: Opensend Reconnect API Event -> timestamp.
The following screenshot shows a few examples:
4.4 Flow Dynamic Content Update:
You can use the following dynamic variables in your email content::
- Checkout URL - checkout_url
- Product Image URL - image_url
- Product Title - item_name
- Product Page URL - url
- Product Price - price
- Product Price - quantity
Example HTML email: Checkout Abandonment
We can access subscriber information by using Salesforce Personalization:
To access event items, we can use AMPScript to query the Opensend Reconnect Event Item DE:
<p>Event items:</p>

<ul>

%%[

  Var @eventItems, @rowCount

  /* Retrieve rows */

  /* Note that case of data extension, column name, and value don't match the source data */

  Set @eventItems = LookupRows("Opensend Reconnect Event Item","event_id", event_id)

  Set @rowCount = RowCount(@eventItems)

  If @rowCount > 0 then

    For @counter = 1 to @rowCount do

      Var @row, @item_id, @item_name, @price, @quantity, @image_url

      Set @row = Row(@eventItems, @counter)

      Set @item_id = Field(@row, "item_id")

      Set @item_name = Field(@row, "item_name")

      Set @price = Field(@row, "price")

      Set @quantity = Field(@row, "quantity")

      Set @image_url = Field(@row, "image_url")

]%%

  <li>%%=v(@item_id)=%% %%=v(@item_name)=%% %%=v(@price)=%%)  %%=v(@quantity)=%% %%=v(@image_url)=%%</li>

%%[

      Next @counter

  EndIf

]%%

</ul>